Save Selected Media
The Timeline Pane enables you to save recordings to your desktop, a local hard drive, or other locations on the computer network. The software is not required on the receiving end to play back audio recordings. However, playing back AVI format screen captures outside the system requires installation of the video codec. This can be accomplished by sending the recipient the file HgCodec32SfxUser.exe. That file needs to be run on the computer that is going to play back the AVI screen capture. MP4 screen capture media does not need the codec to play outside the system.
While reviewing a recording, you might decide to keep a copy of that recording off‑line for easy access. The Manage Saved Media button enables this functionality.
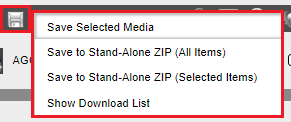
Manage Saved Media – Save Selected Media
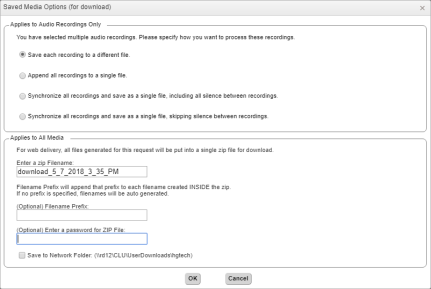
When you click the Save Selected Media option, the Saved Media Options (for download) window appears enabling you to select an option for how you want to process the selected media for saving. When saving one or more audio interactions, or a combination of audio interactions and ScreenCap+Voice interactions, users will have the option to name the .ZIP file containing the selected media, add a filename prefix to each file created inside the .ZIP file, or password protect the .ZIP file.
Checking the Save to Network Folder box allows you to download the files to a folder located on your network named for the current user, provided you have the proper permissions to do so. The network folder location path along with the user’s username will be displayed here. The network location is defined by the SaveToNetworkLocation setting in the G3Config.cfg file. If the network location is not the same HigherGround server running the User Interface service, then the remote server must allow the User Interface service user permission to write files. See the User Interface – New Installation document for the steps to configure the User Interface service user.

Saved Media Options (for download) Window
Users also can configure the software to save both the screen capture and the audio combined into one or separate files within the .ZIP file. The Save ScreenCap+Voice as One File When Saving/Emailing setting can be found in the Retrieval > Settings > User Preferences > Select User Preferences > Application tab. Note that this option only works when saving screen capture media as AVI.
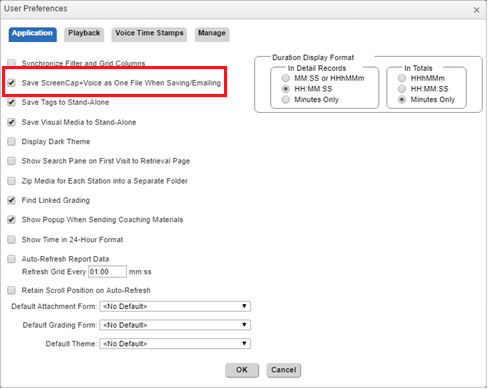
Save ScreenCap+Voice as One File When Saving/Emailing
After selecting how to process multiple audio recordings, a message from the web browser will appear stating that the media selection has been queued for processing, that processing may take a few minutes, that the file will appear in the download list, and a message will be displayed when it is complete

Web Browser Processing Message
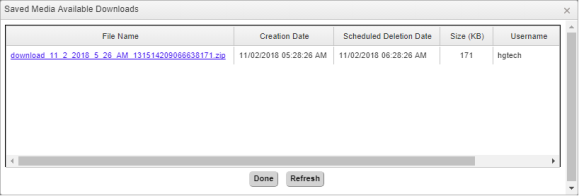
When processing has completed, the Saved Media Available Downloads window will automatically appear with a link containing the media .ZIP file. Click on the link to automatically download the .ZIP file. Click the Refresh button to refresh the downloads list. Click the Done button to close the window.
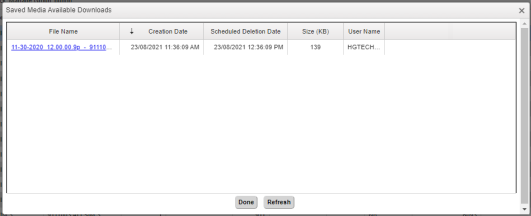
Saved Media Available Downloads
Note that when saving single media files, the downloaded file will not be zipped. This is only done when saving more than one media file.
To download the .ZIP file containing the saved media, click the Manage Saved Media button and select the Show Download List option:
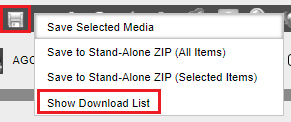
Manage Saved Media - Show Download List
The Saved Media Available Downloads window will appear with a link containing the media .ZIP file. Click on the link to automatically download the .ZIP file. Click the Refresh button to refresh the downloads list. Click the Done button to close the window.
Saved Media Available Downloads
Save Location
When an interaction is saved, depending on the browser application settings, the download will be saved automatically to the user’s Downloads folder or the user will be prompted to Save As giving them an option to where to save the file.
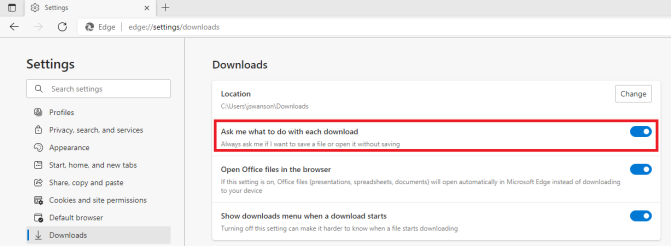
Edge
Go to edge://settings/downloads.
Enable Ask me what to do with each download.
Chrome
Go to chrome://settings/downloads.
Enable Ask where to save each file before downloading.
![]()
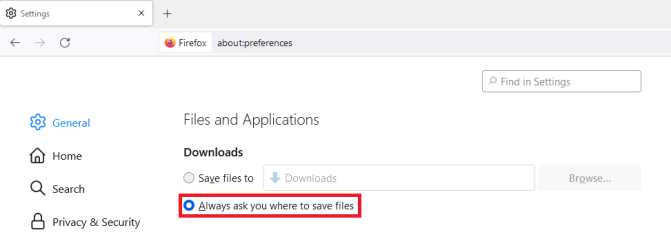
Firefox
Go to about:preferences.
Enable Always ask you where to save files.
Ensuring that these settings are enabled will allow the user to control where downloaded files will be placed.
Saving Multiple Recordings
When multiple recordings are selected, the user can specify how the output will be saved. These options apply only to audio recordings that are selected. Screen capture and video files are never combined into one another.
The radio button options are:
Save each recording to a different file.
Append all recordings to a single file.
Synchronize all recordings and save as a single file, including all silence between recordings.
Synchronize all recordings and save as a single file, skipping silence between recordings.
When the option has been chosen, click the OK button to process the recordings. Checking the Save to Network Folder box allows you to download the files to a folder located on your network named for the current user, provided you have the proper permissions to do so. The network folder location path along with the user’s username will be displayed here. The file output will appear in the Saved Media Available Downloads window when processing is complete.
Multiple Recordings Selected To Be Saved
When saving AVI interactions, note that the browser may initially prevent the download. Check the download button in your browser and click on the option to keep the file, if prompted:
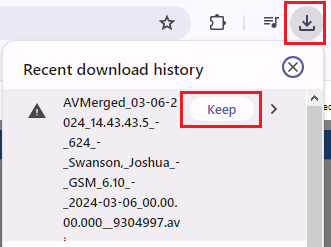
Saving AVI - Keep File